[Spring Boot] 스프링 부트 실행 및 기초
Theme. 프로젝트 생성과 기본 세팅(Spring Tool Suite 4 사용)
File - New - spring starter project 선택

Name에 프로젝트 name 작성 - Maven으로 진행

Spring Boot Version 선택
이미 생성했던 sample1이라는 프로젝트를 통해 설명을 진행하도록 한다.
제일 먼저 pom.xml에서 <dependency>를 세팅해줘야 한다.
내장 tomcat을 사용할 것이므로 아래와 같이 추가해줘야 한다. 중간중간 version에 대한 부분은 새로 만들때마다 바뀌게 될 것이다.
|
1
2
3
4
5
6
7
8
9
10
11
12
13
14
15
16
17
18
19
20
21
22
23
24
25
26
27
28
29
30
31
32
33
34
35
36
37
38
39
40
41
42
43
44
45
46
47
48
49
50
51
52
53
54
|
<?xml version="1.0" encoding="UTF-8"?>
<project xmlns="http://maven.apache.org/POM/4.0.0" xmlns:xsi="http://www.w3.org/2001/XMLSchema-instance"
xsi:schemaLocation="http://maven.apache.org/POM/4.0.0 https://maven.apache.org/xsd/maven-4.0.0.xsd">
<modelVersion>4.0.0</modelVersion>
<parent>
<groupId>org.springframework.boot</groupId>
<artifactId>spring-boot-starter-parent</artifactId>
<version>3.0.4</version>
<relativePath/> <!-- lookup parent from repository -->
</parent>
<groupId>com.example</groupId>
<artifactId>sample1</artifactId>
<version>0.0.1-SNAPSHOT</version>
<name>sample1</name>
<description>Demo project for Spring Boot</description>
<properties>
<java.version>17</java.version>
</properties>
<dependencies>
<dependency>
<groupId>org.springframework.boot</groupId>
<artifactId>spring-boot-starter</artifactId>
</dependency>
<dependency>
<groupId>org.springframework.boot</groupId>
<artifactId>spring-boot-starter-test</artifactId>
<scope>test</scope>
</dependency>
<!-- 추가된 부분 start -->
<dependency>
<groupId>org.springframework.boot</groupId>
<artifactId>spring-boot-starter-web</artifactId>
</dependency>
<dependency>
<groupId>org.springframework.boot</groupId>
<artifactId>spring-boot-starter-tomcat</artifactId>
</dependency>
<!-- 추가된 부분 end -->
</dependencies>
<build>
<plugins>
<plugin>
<groupId>org.springframework.boot</groupId>
<artifactId>spring-boot-maven-plugin</artifactId>
</plugin>
</plugins>
</build>
</project>
|
cs |
프로젝트에는 main 메서드가 포함된 클래스가 존재한다.
서버를 실행할 때, 항상 해당 클래스에서 실행하고, 코드의 변경이 있으면 항상 서버를 껐다가 켜서 사용하는 것을 주의하자.
|
1
2
3
4
5
6
7
8
9
10
11
12
13
14
|
package mul.cam.a;
import org.springframework.boot.SpringApplication;
import org.springframework.boot.autoconfigure.SpringBootApplication;
@SpringBootApplication
public class Sample1Application {
public static void main(String[] args) {
SpringApplication.run(Sample1Application.class, args);
}
}
|
cs |
그리고 @Configuration이라는 annotation을 붙이고 WebMvcConfigurer를 상속하여 사용할 클래스를 생성해준다.
해당 클래스는 클라이언트의 접속을 허가해주는 부분을 설정하는 클래스이다.
|
1
2
3
4
5
6
7
8
9
10
11
12
13
14
15
16
17
18
19
20
21
22
23
24
25
|
package mul.cam.a;
import org.springframework.context.annotation.Configuration;
import org.springframework.web.servlet.config.annotation.CorsRegistry;
import org.springframework.web.servlet.config.annotation.WebMvcConfigurer;
// 외부 접속을 허용해주도록 설정!
@Configuration // 설정
public class WebConfigurer implements WebMvcConfigurer{
@Override // 외부접속에 대한 허가를 해주는 부분
public void addCorsMappings(CorsRegistry registry) {
// 접속 클라이언트를 허가
registry.addMapping("/**").allowedOrigins("*"); // 모든 접속을 허가
// registry.addMapping("/**").allowedOrigins("http://localhost:8090"); // 특정 접속을 허가
}
}
|
cs |
그리고, src/main/resources 안에 application.properties가 존재하는데, 이 부분에서 server의 port number를 세팅할 수 있다.

임의로 3000으로 port number를 세팅하여 사용하도록 한다.
server.port=3000 이라고 작성하면 된다.
Theme. front-end 부분 만들기 전 back-end에서만의 실행 및 결과
이제 Controller를 만들어서 진행해보도록 한다.
아직, front-end부분을 만들지 않았으므로 결과를 확인하기 위해서는,
http://localhost:3000/매핑 value..... 를 입력하여 확인하도록 한다. (크롬 사용)
중간에 HumanDto 클래스 타입의 객체를 생성하여 사용하는 부분이 있는데, 해당 클래스의 코드는 아래와 같다.
|
1
2
3
4
5
6
7
8
9
10
11
12
13
14
15
16
17
18
19
20
21
22
23
24
25
26
27
28
29
30
31
32
33
34
35
36
37
38
39
40
41
42
43
44
45
46
47
48
49
|
package mul.cam.a.dto;
public class HumanDto {
private int number;
private String name;
private String address;
public HumanDto() {}
public HumanDto(int number, String name, String address) {
super();
this.number = number;
this.name = name;
this.address = address;
}
public int getNumber() {
return number;
}
public void setNumber(int number) {
this.number = number;
}
public String getName() {
return name;
}
public void setName(String name) {
this.name = name;
}
public String getAddress() {
return address;
}
public void setAddress(String address) {
this.address = address;
}
@Override
public String toString() {
return "HumanDto [number=" + number + ", name=" + name + ", address=" + address + "]";
}
}
|
cs |
자 이제 HelloController.java의 코드를 살펴보고 결과를 함께 보도록 하자.
|
1
2
3
4
5
6
7
8
9
10
11
12
13
14
15
16
17
18
19
20
21
22
23
24
25
26
27
28
29
30
31
32
33
34
35
36
37
38
39
40
41
42
43
44
45
46
47
48
49
50
51
52
53
54
55
56
57
58
59
60
61
62
63
64
65
66
67
68
69
70
71
72
73
74
75
76
77
78
79
80
81
82
83
84
|
package mul.cam.a.controller;
import java.util.ArrayList;
import java.util.Date;
import java.util.List;
import org.springframework.web.bind.annotation.GetMapping;
import org.springframework.web.bind.annotation.PostMapping;
import org.springframework.web.bind.annotation.RequestMapping;
import org.springframework.web.bind.annotation.RequestMethod;
import org.springframework.web.bind.annotation.RestController;
import mul.cam.a.dto.HumanDto;
@RestController
// MVC model에서의 @Controller(controller부분) + @Responsebody(ajax부분)
public class HelloController {
/////////////// 서버(back-end)에서 값을 보내주기만 하는 부분 ////////////////////////
// http://localhost:3000/
@RequestMapping(value = "/", method = RequestMethod.GET)
public String hello() {
System.out.println("HelloController hello() " + new Date());
return "hello"; // ajax를 통해 값을 front-end로 보내준다.
}
// http://localhost:3000/test
@GetMapping(value = "/test")
public String test() {
System.out.println("HelloController test() " + new Date());
return "테스트";
}
// http://localhost:3000/human
@GetMapping(value = "/human")
public HumanDto getDto() {
System.out.println("HelloController getDto() " + new Date());
HumanDto human = new HumanDto(1001, "홍길동", "서울시");
return human;
}
// http://localhost:3000/get_list
@GetMapping("/get_list")
public List<HumanDto> get_list(){
System.out.println("HelloController get_list() " + new Date());
List<HumanDto> list = new ArrayList<>();
list.add(new HumanDto(101, "홍길동", "서울시"));
list.add(new HumanDto(102, "성춘향", "남원시"));
list.add(new HumanDto(103, "임꺽정", "광주시"));
return list;
}
////////////////// 외부에서 데이터를 서버로 보낸 경우, 서버에서 매개변수로 받는 것 /////////////////////
// 예를 들어, http://localhost:3000/conn_param?title=제목입니다
@GetMapping(value = "/conn_param")
public String conn_param(String title) {
System.out.println("HelloController conn_param() " + new Date());
System.out.println("title: " + title);
return "conn success";
}
// http://localhost:3000/param_obj?number=1002&name=성춘향&address=남원시
@GetMapping(value = "param_obj")
public String param_obj(HumanDto human) {
System.out.println("HelloController param_obj() " + new Date());
System.out.println("human: " + human);
return "OK";
}
}
|
cs |


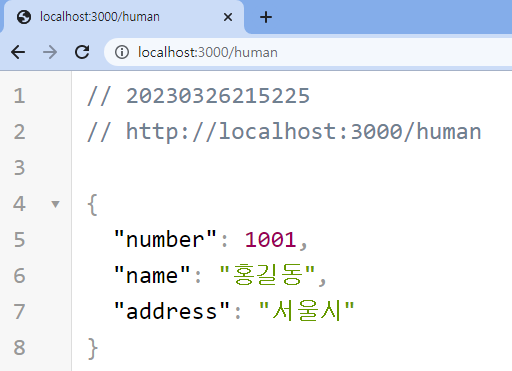
HumanDto 객체를 보내준 결과는 json 형태로 나타나는데, 위와 같이 깔끔하게 보기 위해서는 "JSON VIEWER"를 크롬에 추가했다.


console에도 아래와 같이 "제목입니다"라는 값을 받았음을 알 수 있다.


console에도 아래와 같이 값들을 받았음을 알 수 있다.

Theme. front-end 부분 만들어서 실행 및 결과 확인
eclipse를 이용하여 html 파일들을 만들어 진행하도록 한다. ajax를 활용했다.
1. index.html
|
1
2
3
4
5
6
7
8
9
10
11
12
13
14
15
16
17
18
19
20
21
22
23
24
25
26
27
28
29
30
31
32
33
34
35
36
37
38
39
40
41
42
43
44
45
46
47
48
49
50
51
52
53
54
55
56
57
58
59
60
61
62
63
64
65
66
67
68
69
70
71
72
73
74
75
76
77
78
79
80
81
82
83
84
85
86
87
88
89
90
91
92
93
94
95
96
97
98
99
100
101
102
103
104
105
106
107
108
109
110
111
112
113
114
115
116
117
118
119
120
121
122
123
124
125
126
|
<!DOCTYPE html>
<html>
<head>
<meta charset="UTF-8">
<title>Insert title here</title>
<script src="https://ajax.googleapis.com/ajax/libs/jquery/3.6.3/jquery.min.js"></script>
</head>
<body>
<p id="demo"></p>
<button type="button" id="btn">hello</button>
<script type="text/javascript">
$(document).ready(function(){
$("#btn").click(function(){
$.ajax({
url:"http://localhost:3000/test",
type:"get",
success:function(str){
// alert('success');
$("#demo").text(str); // 서버(Spring Boot)에서 넘겨받은 str의 값이 p태그 안에 들어오게 됨
},
error:function(){
alert('error');
}
});
});
});
</script>
<br><br>
번호:<h3 id="num"></h3>
이름:<h3 id="name"></h3>
주소:<h3 id="address"></h3>
<button type="button" id="human">human</button>
<script type="text/javascript">
$("#human").click(function(){
$.ajax({
url:"http://localhost:3000/human",
type:"get",
success:function(obj){
// alert('success');
// alert(JSON.stringify(obj));
$("#num").text(obj.number); // json이므로!
$("#name").text(obj.name);
$("#address").text(obj.address);
},
error:function(){
alert('error');
}
});
});
</script>
<br><br>
<h3 id="param"></h3>
<button type="button" id="paramBtn">conn param</button>
<script type="text/javascript">
$("#paramBtn").click(function(){
$.ajax({
url:"http://localhost:3000/conn_param",
type:"get",
data:{ "title":"제목입니다" }, // server로 보내는 data
success:function(str){
$("#param").text(str);
},
error:function(){
alert('error');
}
})
});
</script>
<br><br>
번호:<h3 id="num1"></h3>
이름:<h3 id="name1"></h3>
주소:<h3 id="address1"></h3>
<button type="button" id="list">list</button>
<script type="text/javascript">
$("#list").click(function(){
$.ajax({
url:"http://localhost:3000/get_list",
type:"get",
success:function(obj){
// alert('success');
// alert(JSON.stringify(obj));
$("#num1").text(obj[1].number); // 102
$("#name1").text(obj[1].name); // 성춘향
$("#address1").text(obj[1].address); // 남원시
},
error:function(){
alert('error');
}
});
});
</script>
</body>
</html>
|
cs |
index.html의 실행 결과는 다음과 같다.

각 버튼을 누르게 되면,
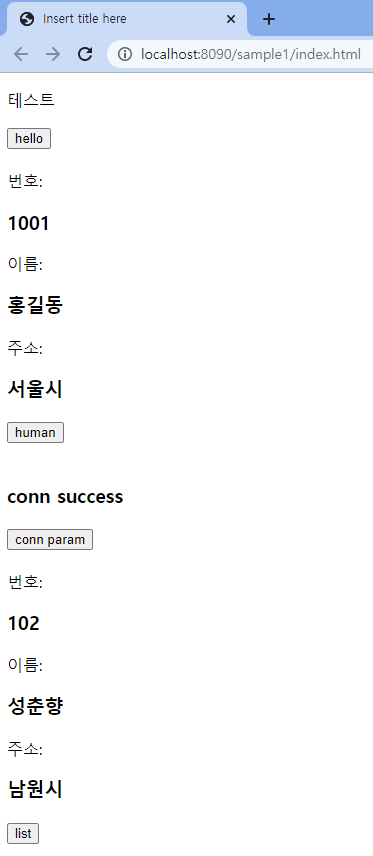
STS에서 console 결과를 확인해보면, 중간에 서버로 값을 넘겨준 것이 확인된다. ("제목입니다" 보내준 부분)

만약, ajax를 활용하지 않고 사용한다면,
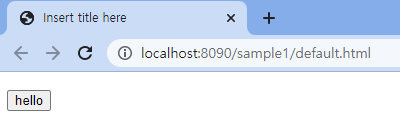
2. default.html
|
1
2
3
4
5
6
7
8
9
10
11
12
13
14
15
16
17
18
19
20
21
22
23
24
25
26
27
28
29
30
31
32
33
34
35
36
|
<!DOCTYPE html>
<html>
<head>
<meta charset="UTF-8">
<title>Insert title here</title>
</head>
<body>
<p id="demo"></p>
<button type="button" onclick="btnclick()">hello</button>
<script type="text/javascript">
function btnclick(){
let xhttp = new XMLHttpRequest();
xhttp.onreadystatechange = function(){
if(xhttp.readyState == 4 && xhttp.status == 200){
// document.getElementById("demo").innerText = xhttp.responseText;
// xhttp.responseText는 문자열이므로 json으로 바꿔줘야 함
let json = JSON.parse(xhttp.responseText); // json 파싱
document.getElementById("demo").innerText = json.name;
}
}
xhttp.open("get", "http://localhost:3000/human", true);
xhttp.send();
}
</script>
</body>
</html>
|
cs |

끝.