CSS 여러 기능 정리
Theme. 배경에 이미지 넣기
|
1
2
3
4
5
6
7
8
9
10
11
12
13
14
15
16
17
18
19
20
21
22
23
24
25
26
|
<!DOCTYPE html>
<html>
<head>
<meta charset="UTF-8">
<title>Insert title here</title>
<style type="text/css">
body{
/* background-color: red;
background-image: url("./image.jpg");
background-repeat: repeat-x;
background-repeat: no-repeat;
background-position: right top; */
background: red url("./image.jpg") no-repeat right top;
}
</style>
</head>
<body>
</body>
</html>
|
cs |
background-image: url("경로") 입력을 해 기본적으로 이미지를 가져올 수 있고, 다양한 기능들은 필요에 따라 검색하도록 한다.
Theme. 글자 형태 변경과 <a>태그에 다양한 기능 추가하기
|
1
2
3
4
5
6
7
8
9
10
11
12
13
14
15
16
17
18
19
20
21
22
23
24
25
26
27
28
29
30
31
32
33
34
35
36
37
38
39
40
41
42
43
44
45
46
47
48
49
50
51
52
53
54
55
56
57
58
59
60
61
62
63
64
65
66
67
|
<!DOCTYPE html>
<html>
<head>
<meta charset="UTF-8">
<title>Insert title here</title>
<style>
body{
color: green;
text-align: center;
}
.upper{
text-transform: uppercase;
}
.lower{
text-transform: lowercase;
}
.capital{
text-transform: capitalize;
}
.demo{
font-family: "Times New Roman";
font-style: italic;
font-size: 2em;
color: blue;
}
a{
text-decoration: none;
}
a:link{
color: #ff0000;
}
a:visited{
color: #000;
}
a:hover{
color: blue;
text-decoration: underline;
}
a:active{
color: white;
background-color: blue;
}
</style>
</head>
<body>
<h3>Title</h3>
<p>Hello CSS Html</p>
<p class="upper">Hello CSS Html</p>
<p class="lower">Hello CSS Html</p>
<p class="capital">hello CSS Html</p>
<pre class="demo">
Hello My World
welcome
</pre>
<a href="http://www.google.com">Google home page</a>
<br>
<a href="http://www.google123.com">non-visited home page</a>
</body>
</html>
|
cs |
간단한 설명을 덧붙이자면,
a: link 는 방문 전 링크 상태
a: visited 는 방문 후 링크 상태
a: hover 는 마우스 포인터를 링크에 가져갔을 때, 링크 상태(클릭 X)
a: active 는 클릭했을 때 링크 상태
이고, 가능한 한 위 순서대로 적용하는 것이 바람직하다.
결과를 살펴보면

Theme. <style>태그로 감싼 부분을 별도의 CSS 파일로 저장하여 사용하기
external 방식으로 CSS를 사용하는 것이다.
왜 별도로 CSS파일을 만들고 외부로부터 그 파일을 불러와 현재 파일에서 사용하려고 할까?
가장 큰 이유는 "중복"의 제거이다.
극한의 상황을 가정해보자.
1억개의 html파일에 동일한 <style> 태그 부분이 존재한다고 하자.
이 때, 일부 효과를 수정해야 한다면, 1억개의 파일 각각에 대하여 수정을 해줘야 한다.
만약, 중복된 코드들을 별도의 장소에 저장해놓고, 이를 다양한 파일들이 가져가 사용할 수 있게하며, 필요에 따라 모든 파일들에 적용되는 코드들을 한번에 수정할 수 있다면? 굉장히 효율적일 것이다.
이를 위해, 별도의 CSS 파일을 외부에 저장해놓는 것이다.
방법은 간단하다.
<style>태그로 감싼 부분을 주석처리 해놓고 그만큼을 다른 CSS 파일에 저장해 놓은 것을 나타내고, CSS파일을 불러오는 코드를 아래 나타내보면,
|
1
2
3
4
5
6
7
8
9
10
11
12
13
14
15
16
17
18
19
20
21
22
23
24
25
26
27
28
29
30
31
32
33
34
35
36
37
38
39
40
41
42
43
44
45
46
47
48
49
50
51
52
53
54
55
56
57
58
|
<!DOCTYPE html>
<html>
<head>
<meta charset="UTF-8">
<title>Insert title here</title>
<!-- <style>
table {
width: 100%;
border-collapse: collapse;
}
table, th, td {
border: 1px solid black;
}
th {
height: 30px;
background-color: #00ff00;
color: white;
}
td {
padding: 10px;
}
td.center{
text-align: center;
}
</style> -->
<!-- external -->
<link rel="stylesheet" href="table.css">
</head>
<body>
<table>
<tr>
<th>번호</th>
<th>이름</th>
<th>나이</th>
</tr>
<tr>
<td class="center">1</td>
<td>홍길동</td>
<td>24</td>
</tr>
<tr>
<td class="center">2</td>
<td>성춘향</td>
<td>16</td>
</tr>
</table>
</body>
</html>
|
cs |
|
1
2
3
4
5
6
7
8
9
10
11
12
13
14
15
16
17
18
19
20
21
22
23
24
|
@charset "EUC-KR";
table {
width: 100%;
border-collapse: collapse;
}
table, th, td {
border: 1px solid black;
}
th {
height: 30px;
background-color: #00ff00;
color: white;
}
td {
padding: 10px;
}
td.center{
text-align: center;
}
|
cs |
첫번째는 html파일, 두번째는 CSS파일이다.
첫번째 html파일에서 <link rel="stylesheet" href="table.css"> 부분이 외부 CSS파일을 불러와 사용하는 태그이다.
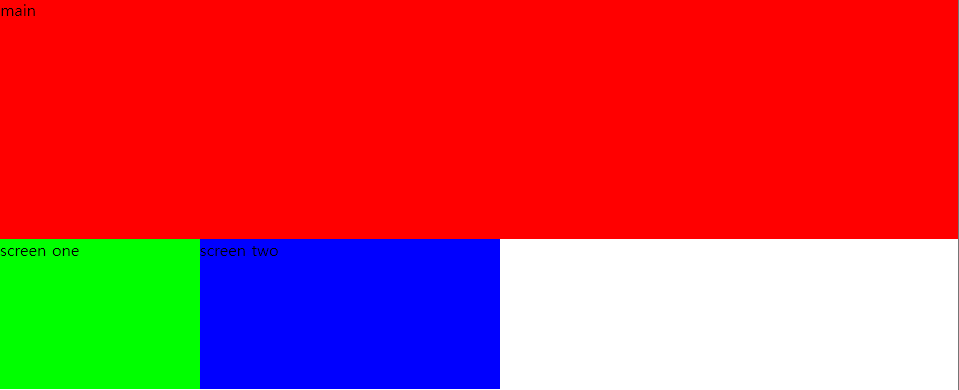
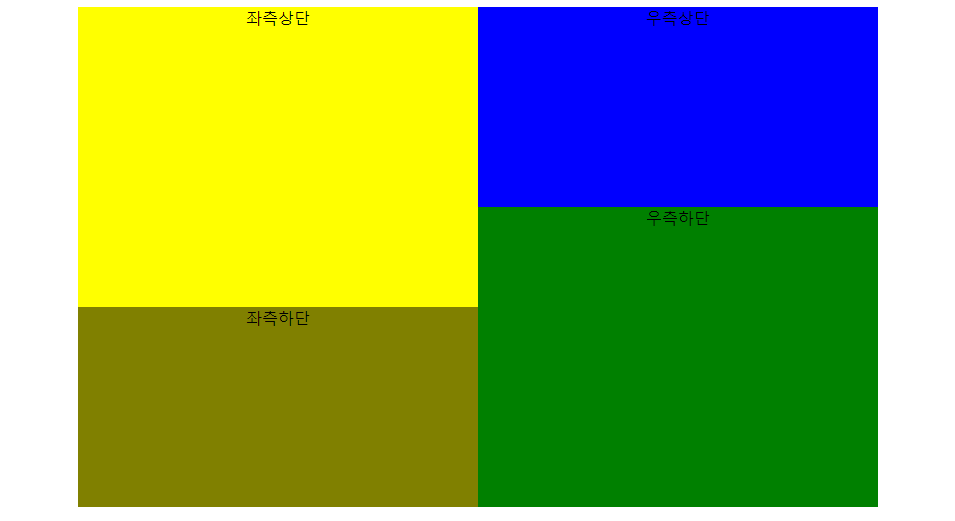
Theme. 화면 분할
화면 분할하는 방법과 결과를 정리한다.
|
1
2
3
4
5
6
7
8
9
10
11
12
13
14
15
16
17
18
19
20
21
22
23
24
25
26
27
28
29
30
31
32
33
34
35
36
37
38
39
40
41
42
43
44
45
46
47
48
49
|
<!DOCTYPE html>
<html>
<head>
<meta charset="UTF-8">
<title>Insert title here</title>
<style type="text/css">
body{
margin: 0;
}
#mainscr{
width: 100%;
height: 240px;
background-color: #ff0000;
}
#one{
width: 200px;
height: 150px;
background-color: #00ff00;
float: left;
}
#two{
width: 300px;
height: 150px;
background-color: #0000ff;
float: left;
}
</style>
</head>
<body>
<div id="mainscr">
main
</div>
<div id="one">
screen one
</div>
<div id="two">
screen two
</div>
</body>
</html>
|
cs |
|
1
2
3
4
5
6
7
8
9
10
11
12
13
14
15
16
17
18
19
20
21
22
23
24
25
26
27
28
29
30
31
32
33
34
35
36
37
38
39
40
41
42
43
44
45
46
47
48
49
50
51
52
53
54
55
56
57
58
59
60
61
62
63
64
65
66
67
68
|
<!DOCTYPE html>
<html>
<head>
<meta charset="UTF-8">
<title>Insert title here</title>
<style>
#fullscreen{
width: 800px;
height: 500px;
background-color: gray;
}
#left{
width: 400px;
height: 500px;
background-color: orange;
float: left;
}
#leftup{
width: 400px;
height: 300px;
background-color: yellow;
}
#leftdown{
width: 400px;
height: 200px;
background-color: olive;
}
.right{
width: 400px;
height: 500px;
background-color: red;
float: left;
}
.rightup{
width: 400px;
height: 200px;
background-color: blue;
}
.rightdown{
width: 400px;
height: 300px;
background-color: green;
}
</style>
</head>
<body>
<div align="center">
<div id="fullscreen">
<div id="left">
<div id="leftup">좌측상단</div>
<div id="leftdown">좌측하단</div>
</div>
<div class="right">
<div class="rightup">우측상단</div>
<div class="rightdown">우측하단</div>
</div>
</div>
</div>
</body>
</html>
|
cs |
추가로, CSS 기초적인 공부하기 좋은 사이트: https://www.yalco.kr/@html-css/2-1/
CSS 적용방법(inline, internal, linked)과 선택자들
어려운 프로그래밍 개념들을 쉽게 설명해주는 유튜브 채널 '얄팍한 코딩사전'. 영상에서 다 알려주지 못한 정보들이나 자주 묻는 질문들의 답변들, 예제 코드들을 얄코에서 확인하세요!
www.yalco.kr